Creating ClickOnce installers with native registration free COM objects (with Paket and F#AKE)
I haven’t found any good intro to this online (only parts of it), so I will give my best to describe the process I took here.
The goal is, to create a ClickOnce installer for a .NET project, which contains a dependency to a COM object. The quirk here is, that we have to deploy this COM object with the project and we have no control over it. We just have been given a DLL, which in turn is a native COM object.
Prerequisites
We have gotten a native COM dll named ForeignInterface.dll, which we have to deploy with our project.
The problem is, that ClickOnce does’t allow to register COM objects on installation, as the ClickOnce installation runs in the security context of the user.
We have two possibilities here. We can create a separate MSI installer and add it as prerequisite to the ClickOnce installer or we can use Registration-Free COM Interop.
I describe here the latter, as it has some quirks to it, which I will address here.
Warning: All id’s, names etc. I use here are faked. So please replace them with your own.
Step 1: Creating the project
For demonstration purposes, we create a simple console project:
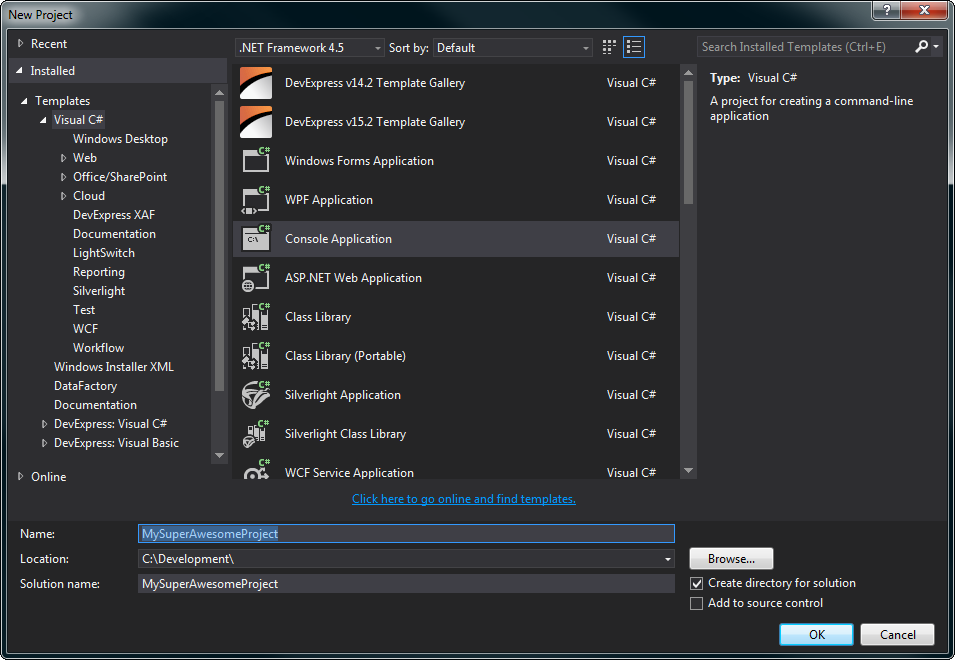
The project lives now in C:\Development\MySuperAwesomeProject\MySuperAwesomeProject.
Next we import the native COM dll, so that the DLL is copied over to the bin directory:
- Right click on your project
- Click on
Add→Existing Item - Select
All Files (*.*)in the filter combo box - Browse to the
ForeignInterface.dlland select it - Click
Add - The select it in the Solution Explorer and set
Copy to Output DirectorytoCopy if newer -
Your Solution should now look like this:
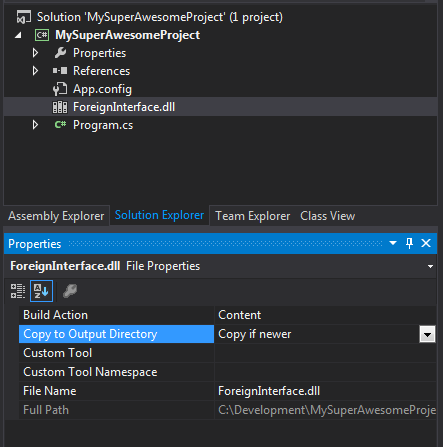
- Also the
ForeignInterface.dllshould have been copied over to your project directory.
Step 2: Creating a COM wrapper
First we have to create a Wrapper, so that we can use the native COM object in .NET.
The most control we have with the tlbimp.exe tool.
So we open the Developer Command Prompt for VS2013, go to our project directory and use this command to create an Interop assembly:
tlbimp.exe /out:Interop.ForeignInterface.dll /namespace:ForeignInterface ForeignInterface.dllThis creates the the Interop Assembly Interop.ForeignInterface.dll in our project folder.
For further information see here.
Now we add it as Reference to our project:
- Right click on
Referencesand then onAdd Reference... - Click
Browse, browse to yourInterop.ForeignInterface.dlland add it. - Then click
OKin the Reference manager.
We now can test our COM interface:
namespace MySuperAwesomeProject
{
    using System;
    using System.Diagnostics;
    using System.Runtime.InteropServices;
    using ForeignInterface;

    public class Program
    {
        public static void Main(string[] args)
        {
            try
            {
                var impl = new ForeignInterface();
                Console.WriteLine(impl.Process("FOO"));
            }
            catch (COMException e)
            {
                Console.WriteLine("ERROR: {0}", e.Message);
            }
            Console.ReadKey();
        }
    }
}
If we execute this, then the following error should occur:
ERROR: Retrieving the COM class factory for component with CLSID {A1A168E6-3591-41C9-87D6-3E21588C7FFB} failed due to the following error: 80040154 Class not registered (Exception from HRESULT: 0x80040154 (REGDB_E_CLASSNOTREG)).
If we get a valid result, then the COM component is already registered. For further testing we open an Administrator console, navigate to the project directory and execute the following command:
regsvr32 /u ForeignInterface.dll
This deregisters the COM component in the system, and the error message above should occur on execution.
Step 3: Preparing for Registration-Free COM Interop
This is a two step process. First we need a side-by-side manifest for the ForeignInterface.dll, so we can reference it as dependency in our application.
Then we have to create an application manifest which adds the side-by-side manifest as dependency.
Step 3.1: Creating a side-by-side manifest for the COM dll
for this we use the mt.exe from the Windows SDK:
mt.exe -dll:ForeignInterface.dll -tlb:ForeignInterface.dll -out:ForeignInterface.sxs.manifest
This creates a basic manifest file for the ForeignInterface.dll:
<?xml version="1.0" encoding="UTF-8" standalone="yes"?>
<assembly xmlns="urn:schemas-microsoft-com:asm.v1" manifestVersion="1.0">

  <file name="ForeignInterface.dll" hashalg="SHA1">
    <comClass clsid="{A1A168E6-3591-41C9-87D6-3E21588C7FFB}"
              tlbid="{7B2E8C1F-CCB0-4261-8289-6598529DBDAF}"/>
    <typelib tlbid="{7B2E8C1F-CCB0-4261-8289-6598529DBDAF}"
             resourceid="1"
             version="2.1"
             helpdir=""
             flags="HASDISKIMAGE" />
  </file>

  <comInterfaceExternalProxyStub name="IForeignInterface"
                                 iid="{63A461A0-93A1-407D-B144-C69F7F299315}"
                                 tlbid="{7B2E8C1F-CCB0-4261-8289-6598529DBDAF}"
                                 proxyStubClsid32="{00020424-0000-0000-C000-000000000046}"/>
</assembly>
We now add this manifest to the project as above, so that it will also be copied over into the bin directory on build.
Your solution now looks like this:
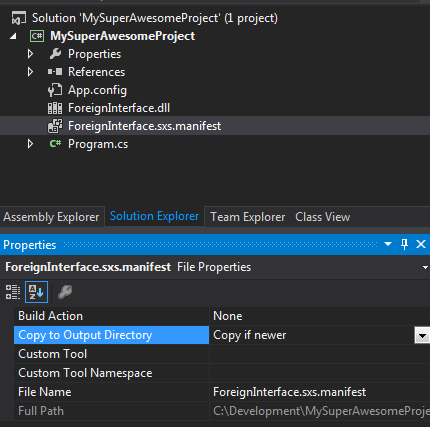
The manifest is now changed a bit, as we need an assembly identity we can refer to:
<?xml version="1.0" encoding="UTF-8" standalone="yes"?>
<assembly xmlns="urn:schemas-microsoft-com:asm.v1" manifestVersion="1.0">
  <assemblyIdentity type="win32" name="ForeignInterface.sxs" version="2.1.0.0" />

  <file name="ForeignInterface.dll" hashalg="SHA1">
    <comClass clsid="{A1A168E6-3591-41C9-87D6-3E21588C7FFB}"
              tlbid="{7B2E8C1F-CCB0-4261-8289-6598529DBDAF}"/>
    <typelib tlbid="{7B2E8C1F-CCB0-4261-8289-6598529DBDAF}" version="2.1" helpdir=""  />
  </file>

  <comInterfaceExternalProxyStub name="IForeignInterface"
                                 iid="{63A461A0-93A1-407D-B144-C69F7F299315}"
                                 tlbid="{7B2E8C1F-CCB0-4261-8289-6598529DBDAF}"
                                 proxyStubClsid32="{00020424-0000-0000-C000-000000000046}"/>
</assembly>
Note that I added the assemblyIdentity tag with the same name as the manifest but without the .manifest extension. I also removed the flags and the resourceid attributes from the typelib tag as they are not needed.
If you wish, you can also add a description attribute to the typelib and comClass tags.
Step 3.2: Creating an application manifest and adding the dependency
Now we have to add the dependency to our application. For this we create an application manifest:
- Right click on your Project
-
Add→New Item... -
General→Application Manifest File: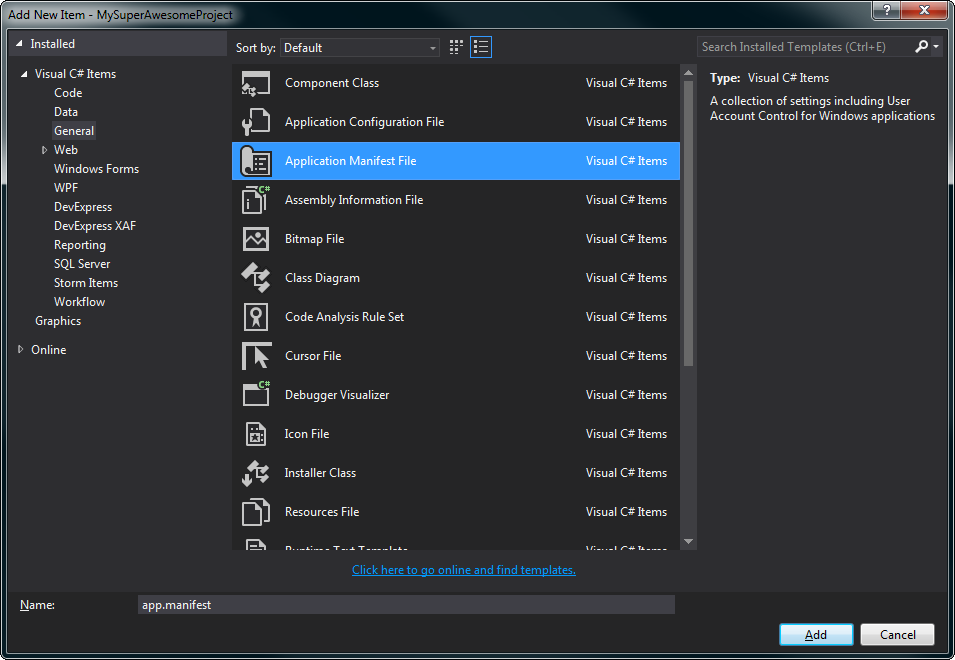
Now we replace the content of the application manifest with the following:
<?xml version="1.0" encoding="utf-8"?>
<asmv1:assembly manifestVersion="1.0" xmlns="urn:schemas-microsoft-com:asm.v1" xmlns:asmv1="urn:schemas-microsoft-com:asm.v1" xmlns:asmv2="urn:schemas-microsoft-com:asm.v2" xmlns:xsi="http://www.w3.org/2001/XMLSchema-instance">
  <trustInfo xmlns="urn:schemas-microsoft-com:asm.v2">
    <security>
      <requestedPrivileges xmlns="urn:schemas-microsoft-com:asm.v3">
        <requestedExecutionLevel level="asInvoker" uiAccess="false" />
      </requestedPrivileges>
    </security>
  </trustInfo>

  <dependency>
    <dependentAssembly>
      <assemblyIdentity type="win32" name="ForeignInterface.sxs" version="2.1.0.0" />
    </dependentAssembly>
  </dependency>
</asmv1:assembly>
The crucial part here is the dependentAssembly tag. The contained assemblyIdentity should be the same as the one in ForeignInterface.sxs.manifest. If you have more then one COM object to include, simply add more dependency tags.
The last step is to set the app.manifest as application manifest and disable the Visual Studio Hosting process:
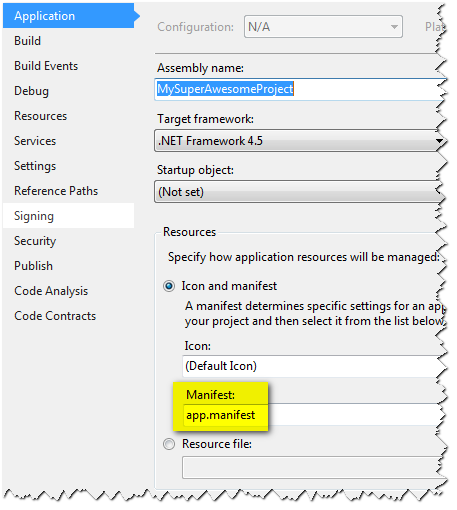
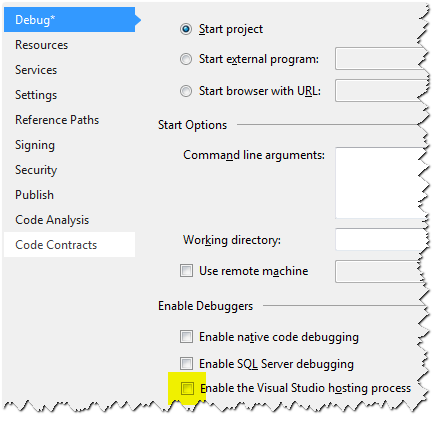
You need to disable the VS hosting process, as the MyAwesomeProject.vshost.exe uses a different manifest, and therefore debugging would not work. Also if you want to unit test your COM-Object, you have to do extra steps which I will not explain here. For further information see here.
Congratulations, your project should now run correctly without error.
Step 4: Preparing the Paket and F#AKE
I will use Paket and F#AKE here for simplicity purposes.
Step 4.1: Preparing Paket
- Create a new directory in your solution directory named
.paket-
Tip: enter
.paket.(the name ending with a full-stop) as directory name when creating the directory with Windows explorer
-
Tip: enter
- Download the
paket.bootstrapper.exefrom https://github.com/fsprojects/Paket/releases and put it into the.paketdirectory- This executable will also be checked in into your Source Code Management System!
-
Add the following batch file (for convenience) and name it
paket.bat@ECHO OFF .paket\paket.bootstrapper.exe IF ERRORLEVEL 1 ( EXIT /B %ERRORLEVEL% ) .paket\paket.exe %* - now run
paket initon the command line in your solution dir- This downloads the current version of Paket and creates an initial
paket.dependenciesfile
- This downloads the current version of Paket and creates an initial
-
modify the
paket.dependenciesso that it looks like this:source https://www.nuget.org/api/v2 nuget FAKE - now run
paket installon the command line- This downloads the F#AKE NuGet package into the packages folder under
packages\FAKEand creates thepaket.lockfile - both
paket.lockandpaket.dependenciesshould be checked in into your SCM - the
packagesfolder and the.paket\paket.exeshould stay out of your SCM!
- This downloads the F#AKE NuGet package into the packages folder under
-
For convenience reasons we create also a
fake.batfile:@ECHO OFF CLS CALL paket.bat restore IF ERRORLEVEL 1 ( EXIT /B %ERRORLEVEL% ) SET FAKE="%~dp0packages\FAKE\tools\FAKE.EXE" :build ECHO ----------- BUILDING --------------------- IF EXIST "%~dp0Build.log" DEL /F /Q "%~dp0Build.log" %FAKE% "%~dp0build.fsx" %1 -lf Build.log PAUSE
Step 4.2: Adding a F#AKE build script
You should install “Visual F#” and the “Visual F# Power Tools” extensions in Visual Studio, if you want to edit the build file with IntelliSense. Another option would be Visual Studio Code with the Ionide Extension
First add a new F# script file (or TextFile, if this template is missing) to your solution (in your solution directory) and name it build.fsx
My build.fsx has the following content:
#r "packages/FAKE/tools/FakeLib.dll"

open Fake

// project and version info
let projectName = "MySuperAwesomeProject"
let version = "0.1.0.0"  // or retrieve from CI server

// Directories
let buildDir  = @".\build\"
let deployDir = @".\deploy\"
let publishDir = deployDir  @@ (sprintf "%s.%s" projectName version)

// Filesets
let appReferences  = !! "**/*.csproj"

Target "Clean" (fun _ ->
    CleanDirs [buildDir; deployDir; publishDir]
)

Target "Build" (fun _ ->
    MSBuildRelease buildDir "Build" appReferences
    |> Log "Release Build-Output: "
)

Target "Prepare Deployment" (fun _ ->
    trace "This will be filled in a moment"
)

Target "Create ClickOnce Installer" (fun _ ->
    trace "This will be filled in a moment"
)

Target "Deploy" (fun _ ->
    trace "Deploy the created ClickOnce installer wherever you want"
)

"Clean"
  ==> "Build"
  ==> "Prepare Deployment"
  ==> "Create ClickOnce Installer"
  ==> "Deploy"

RunTargetOrDefault "Deploy"
You should now be able to build the project on the command line via fake.
The build output should land in the build directory and an empty deploy directory should be created.
For more information about how to use F#AKE see here.
Step 5: Creating the ClickOnce Application
Now for the gist of this article. To create a ClickOnce application we use the Manifest Generation and Editing Tool (mage.exe).
In F#AKE exists a helper which will do most of the work for us.
First we implement the "Prepare Deployment" target:
Target "Prepare Deployment" (fun _ ->
    !! (buildDir @@ "**/*.*")
    -- "**/ForeignInterface.dll"
    -- "**/*.pdb"
    |> CopyFiles publishDir
)
This copies everything except the ForeignInterface.dll and all .pdb files into the deployment directory.
The ForeignInterface.dll is skipped here because it would otherwise referenced by the mage tool, which leads to an attempt to copy the DLL twice because the side-by-side manifest references this DLL also. This in turn would lead to an error on installation!
On the beginning of the file we add a helper, so we can use it as a reference:
let EmptyMageParams =  {
  ToolsPath = "C:/Program Files (x86)/Microsoft SDKs/Windows/v8.1A/bin/NETFX 4.5.1 Tools"
  Manifest = ""
  ApplicationFile = ""
  CertFile = None

  Name = projectName
  Version = version
  Processor = X86
  TrustLevel = None
  Publisher = Some "MyAwesomeCompany"
  ProviderURL = ""
  SupportURL = None
  FromDirectory = ""

  ProjectFiles = []
  IconPath = ""
  IconFile = ""
  TmpCertFile = ""
  Password = None
  CertHash = None
  IncludeProvider = None
  Install = None
  UseManifest = None
  CodeBase = None
}
Now we can create our "Create ClickOnce Installer" target:
Target "Create ClickOnce Installer" (fun _ ->
    let appManifest = publishDir @@ (sprintf "%s.exe.manifest" projectName)
    let deployManifest = sprintf "%s.application" projectName
    let appParams = { EmptyMageParams with Manifest = appManifest
                                           ApplicationFile = publishDir @@ (sprintf "%s.exe" projectName)
                                           TrustLevel = Some FullTrust
                                           FromDirectory = publishDir
                                           IconPath = publishDir
                                           IconFile = projectName + ".ico"
                                           IncludeProvider = Some false
                                           UseManifest = Some true }

    let deployParams = { EmptyMageParams with Manifest = appManifest
                                              ApplicationFile = deployDir @@ deployManifest
                                              Install = Some true }
    MageCreateApp appParams
    // MageSignManifest appParams
    MageDeployApp deployParams
    // MageSignDeploy deployParams

    (buildDir @@ "ForeignInterface.dll") |> CopyFile publishDir
)
*Note that we copy the ForeignInterface.dll to the deployment directory after we created and signed the manifests.**
If you want to sign the manifests you need to add a certificate file to the solution. You can then
reference this file with the CertFile setting in the EmptyMageParams. You can then uncomment the MageSignManifest and MageSignDeploy commands.
I usually want to change also the .application file a bit, so that the application will be updated on start.
For this I have written a little helper function, which is added at the beginning of the build.fsx:
#r "System.Xml.Linq.dll"
open System.Xml.Linq

let setUpdatePolicy (filename: string) =
    let n nameSpace name = XName.op_Implicit (nameSpace + name)

    let asmv1 = "{urn:schemas-microsoft-com:asm.v1}"
    let asmv2 = "{urn:schemas-microsoft-com:asm.v2}"
    let cov1 = "{urn:schemas-microsoft-com:clickonce.v1}"

    let removeNode name (node: XElement option) =
        match node with
        | None -> None
        | Some n ->
            match n.Element(name) with
            | null -> ()
            | e -> e.Remove()
            node

    let addNode (name: XName) (node: XElement option) =
        match node with
        | Some n -> n.Add(new XElement(name))
        | _ -> ()

    let element name (node: XElement option) : XElement option =
        match node with
        | None -> None
        | Some n ->
            match n.Element(name) with
            | null -> None
            | e -> Some e

    let doc = XDocument.Load(filename)

    Some doc.Root
    |> element (n asmv2 "deployment")
    |> element (n asmv2 "subscription")
    |> element (n asmv2 "update")
    |> removeNode (n asmv2 "expiration")
    |> addNode (n asmv2 "beforeApplicationStartup")

    doc.Save(filename)
Now i can call
deployDir @@ deployManifest |> setUpdatePolicydirectly before MageSignDeploy.
TL:DR
The important parts are:
- Deploy the COM DLL and a corresponding
.sxs.manifest - Add a dependency to the
.sxs.manifestin the application manifest - The publish directory should have a version on it, so you can simply deploy a new version into your target directory and just update the
.applicationfile. - Copy all files except for the COM DLL into the Publish Directory
- Copy the COM DLL after creation of the ClickOnce manifests
The final script now looks like this.
#r "packages/FAKE/tools/FakeLib.dll"

open Fake

// project and version info
let projectName = "MySuperAwesomeProject"
let version = "0.1.0.0"  // or retrieve from CI server

// Directories
let buildDir  = @".\build\"
let deployDir = @".\deploy\"
let applicationDirName = (sprintf "%s.%s" projectName version)
let publishDir = deployDir @@ applicationDirName

// Filesets
let appReferences  = !! "**/*.csproj"


let EmptyMageParams =  {
    ToolsPath = @"C:\Program Files (x86)\Microsoft SDKs\Windows\v8.1A\bin\NETFX 4.5.1 Tools"
    Manifest = ""
    ApplicationFile = ""
    CertFile = None

    Name = projectName
    Version = version
    Processor = MSIL
    TrustLevel = None
    Publisher = Some "MyAwesomeCompany"
    ProviderURL = ""
    SupportURL = None
    FromDirectory = ""

    ProjectFiles = []
    IconPath = ""
    IconFile = ""
    TmpCertFile = ""
    Password = None
    CertHash = None
    IncludeProvider = None
    Install = None
    UseManifest = None
    CodeBase = None }


#r "System.Xml.Linq.dll"
open System.Xml.Linq

let setUpdatePolicy (filename: string) =
    let n nameSpace name = XName.op_Implicit (nameSpace + name)

    let asmv1 = "{urn:schemas-microsoft-com:asm.v1}"
    let asmv2 = "{urn:schemas-microsoft-com:asm.v2}"
    let cov1 = "{urn:schemas-microsoft-com:clickonce.v1}"

    let removeNode name (node: XElement option) =
        match node with
        | None -> None
        | Some n ->
            match n.Element(name) with
            | null -> ()
            | e -> e.Remove()
            node

    let addNode (name: XName) (node: XElement option) =
        match node with
        | Some n -> n.Add(new XElement(name))
        | _ -> ()

    let element name (node: XElement option) : XElement option =
        match node with
        | None -> None
        | Some n ->
            match n.Element(name) with
            | null -> None
            | e -> Some e

    let doc = XDocument.Load(filename)

    Some doc.Root
    |> element (n asmv2 "deployment")
    |> element (n asmv2 "subscription")
    |> element (n asmv2 "update")
    |> removeNode (n asmv2 "expiration")
    |> addNode (n asmv2 "beforeApplicationStartup")

    doc.Save(filename)


Target "Clean" (fun _ ->
    CleanDirs [buildDir; deployDir; publishDir]
)

Target "Build" (fun _ ->
    MSBuildRelease buildDir "Build" appReferences
    |> Log "Release Build-Output: "
)

Target "Prepare Deployment" (fun _ ->
    !! (buildDir @@ "**/*.*")
    -- "**/ForeignInterface.dll"
    -- "**/*.pdb"
    |> CopyFiles publishDir
)

Target "Create ClickOnce Installer" (fun _ ->
    let appManifest = publishDir @@ (sprintf "%s.exe.manifest" projectName)
    let deployManifest = sprintf "%s.application" projectName
    let appParams = { EmptyMageParams with Manifest = appManifest
                                           ApplicationFile = publishDir @@ (sprintf "%s.exe" projectName)
                                           TrustLevel = Some FullTrust
                                           FromDirectory = publishDir
                                           IconPath = publishDir
                                           IconFile = projectName + ".ico"
                                           IncludeProvider = Some false
                                           UseManifest = Some true }

    let deployParams = { EmptyMageParams with Manifest = appManifest
                                              ApplicationFile = deployDir @@ deployManifest
                                              Install = Some true }
    MageCreateApp appParams
    // MageSignManifest appParams
    MageDeployApp deployParams
    deployDir @@ deployManifest |> setUpdatePolicy
    // MageSignDeploy deployParams

    (buildDir @@ "ForeignInterface.dll") |> CopyFile publishDir
)

Target "Deploy" (fun _ ->
    trace "Deploy the created ClickOnce installer wherever you want"
)

"Clean"
  ==> "Build"
  ==> "Prepare Deployment"
  ==> "Create ClickOnce Installer"
  ==> "Deploy"

RunTargetOrDefault "Deploy"
You should be able to run fake and in the deploy directory
will be a ClickOnce installer created, which you can deploy anywhere you want.
I hope this helps a bit. Good luck with your own projects.